

A Dutch oven is the ultimate kitchen workhorse, This Viral Cleaning Hack Resurrected My Dutch Oven from simmering hearty stews and soups to baking crusty bread and roasting meats; it handles nearly every recipe with ease. But over time, even the most durable Dutch oven begins to show signs of wear. Stubborn baked-on food, grease, and scorch marks can make your favorite pot look dull, worn, and frustratingly difficult to clean.
For months, my Dutch oven sat in the cupboard looking tired, despite countless attempts with dish soap, soaking, and scrubbing. I almost gave up on restoring it until I discovered a viral cleaning hack that completely transformed my cookware.
Why This Viral Hack Works Wonders
The magic behind this method is its simplicity, safety, and effectiveness. Unlike harsh chemical cleaners or abrasive tools, it uses baking soda and hot water, two ingredients almost every home already has.
- Baking soda is mildly alkaline, allowing it to break down grease, dissolve stubborn food residue, and soften baked-on particles without damaging the enamel of cookware.
- When combined with heat and steam, it penetrates even the most stubborn baked-on food, loosening it effortlessly.
- This approach reduces scrubbing, prevents scratches, and lets chemistry do the hard work for you.
The result? Your Dutch oven comes back to life without risk of damage or heavy labor.
Step-by-Step Guide: Bring Your Dutch Oven Back to Life
Reviving your Dutch oven is simple, effective, and surprisingly satisfying:
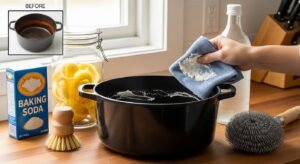
Fill with Hot Water – Pour hot tap water until the pot is halfway full. Heat helps loosen stubborn food particles and grease.
Add baking Soda – Mix two tablespoons per quart of water for a gentle yet effective natural cleaner.
Simmer Gently – Place the pot on the stove, cover it, and simmer for 15–30 minutes. Steam helps loosen residue along the sides and bottom.
Cool Slightly, Then Clean – Let it cool enough to handle, then use a non-abrasive sponge or plastic scraper to wipe away softened baked-on food.
After just one session, stubborn residue and grease lift effortlessly, leaving your Dutch oven looking clean, fresh, and ready for your next culinary adventure.
What You Can Expect
While this method works wonders, it’s important to set realistic expectations:
- Baked-on food and grease: Softens and lifts with minimal effort.
- Surface scorch marks: Browning from meats or sauces typically loosens easily.
- Deep enamel discoloration: Stains embedded over the years may not disappear completely, though they won’t affect performance.
Even with minor permanent stains, your Dutch oven will look dramatically cleaner, fresher, and easier to maintain, making future cleaning a breeze.
Pro Tips for Maintaining Your Dutch Oven
Keeping your Dutch oven looking and performing like new is easier Cleaning than you think:
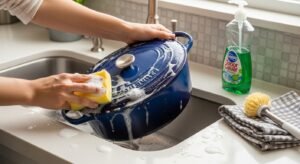
- Wash promptly: Clean with warm water and mild soap immediately after use.
- Avoid harsh scrubbers: Metal pads or abrasive cleaners can scratch enamel.
- Use enamel-safe cleaners occasionally: Maintains a smooth, polished surface.
- Dry completely: Prevents rust around the rim or lid edges.
- Store properly: Keep the lid slightly ajar to allow airflow if storing long-term.
These small steps prevent buildup, protect your enamel, and ensure your Dutch oven stays functional for years.
Why Every Home Cook Needs This Hack
There’s a special satisfaction in watching a once-worn Dutch oven shine again. Beyond aesthetics:
- It’s safer and more hygienic, Cleaning reducing the risk of old food residue contaminating future meals.
- It extends the life of your investment in high-quality enamel cookware.
- It transforms cleaning from a chore into a simple, stress-free task, allowing your Dutch oven to shine for slow-cooked dinners, weekend bread, and countless recipes in between.
With this method, maintaining your cookware becomes effortless, and your meals taste even better in a clean, well-kept pot.
Final Thoughts
This viral cleaning hack didn’t just clean my Dutch oven, it resurrected it. What once looked dull, grimy, and impossible to clean now gleams and performs beautifully. Safe, inexpensive, and highly effective, this method is a must-try for any home cook who wants to restore their Dutch oven, remove stubborn baked-on food, and maintain enamel cookware for years to come.
If your Dutch oven has seen better days, try this baking soda and hot water method. With minimal effort, you’ll enjoy a pot that looks and performs like new, making cooking and Cleaning easier and more enjoyable than ever.
FAQs
Can I use this method on all types of Dutch ovens?
Yes! This Cleaning method works best on enameled cast-iron Dutch ovens, which can handle heat and baking soda. Avoid using abrasive cleaners on uncoated cast iron to prevent damage.
Will this remove all stains permanently?
It effectively removes baked-on food, grease, and surface scorch marks, but deep enamel discoloration from years of use may not disappear completely. The pot’s performance will remain unaffected.
How often should I clean my Dutch oven this way?
Use this method as needed, particularly for heavily soiled or baked-on residue. For regular Cleaning maintenance, washing with mild soap and warm water is sufficient.
Can I leave the Dutch oven soaking overnight instead?
Soaking helps, but combining heat, steam, and baking soda is far more effective at loosening stubborn residues. Overnight soaking alone may not achieve the same results.