

Scrambled eggs seem simple, yet they remain one of the most misunderstood dishes in home cooking. You’ve probably experienced it: rubbery, dry eggs that bear little resemblance to the creamy, cloud-like masterpiece you envisioned.
The truth is, learning how to cook scrambled eggs for beginners isn’t just about cracking eggs into a pan—it’s about understanding temperature control, timing, and technique.
Whether you’re a college student mastering your first meal, a busy parent needing quick nutrition, or someone simply tired of breakfast disappointments, this guide will transform your egg game. Perfect scrambled eggs are achievable, and by the end of this article, you’ll have the confidence and knowledge to create restaurant-quality eggs in your own kitchen.
Fundamentals of How to Cook Scrambled Eggs for Beginners

Before we dive into techniques, let’s talk about what makes scrambled eggs truly exceptional. The difference between mediocre and magnificent scrambled eggs comes down to three critical factors: heat management, agitation, and knowing when to stop cooking.
Many beginners make the mistake of rushing the process over high heat, which produces tough, rubbery eggs with moisture squeezed out. Instead, patience and gentle cooking yield those coveted creamy, custard-like curds that melt in your mouth.
The science behind perfect scrambled eggs is fascinating.
Eggs contain proteins that coagulate (set) at different temperatures—yolks around 149°F (65°C) and whites around 158°F (70°C). When you cook eggs too quickly or at too high a temperature, these proteins tighten aggressively, forcing out moisture and creating that dreaded rubbery texture.
Low and slow cooking allows proteins to form a delicate network that traps moisture, resulting in tender, creamy eggs.
Essential Equipment You’ll Need:
- Non-stick skillet (8-10 inches ideal for 2-3 eggs)
- Silicone spatula or wooden spoon (metal can scratch non-stick surfaces)
- Mixing bowl (stainless steel or glass)
- Whisk or fork
- Measuring spoons
- Plate (for serving immediately)
Ingredient Quality Matters:
| Ingredient | What to Look For | Why It Matters |
| Eggs | Fresh, preferably pasture-raised | Better flavor, richer color, superior nutrition |
| Butter | Unsalted, high-fat content | Controls salt levels, adds richness |
| Milk/Cream | Whole milk or heavy cream | Adds creaminess (optional) |
| Salt | Fine sea salt or kosher salt | Enhances flavor without grittiness |
| Pepper | Freshly ground black pepper | Superior aroma and flavor |
The Science Behind Perfect Texture and Flavor
Understanding what happens inside your pan transforms you from someone who merely cooks eggs to someone who truly masters them. When eggs hit heat, their protein structures begin to unravel and bond together in a process called coagulation.
This isn’t just chemistry—it’s the foundation of texture. The goal isn’t to prevent coagulation (that’s impossible), but to control it gently. Think of egg proteins like a crowd at a concert: if you rush them (high heat), they push and shove, creating chaos and squeezing everyone out.
But guide them slowly (low heat), and they form an organized, comfortable gathering that holds together beautifully.
The moisture content in your scrambled eggs is equally crucial. Eggs are roughly 75% water, and preserving that moisture during cooking is what separates creamy from chalky.
Adding a small amount of dairy—whether milk, cream, or even crème fraiche introduces fat molecules that interfere with protein bonding, creating a more tender final product.
However, purists argue that perfect eggs need nothing but eggs, butter, and salt. Both approaches work; it’s about understanding how each element affects the final dish. Temperature control remains paramount regardless of your additions. A pan that’s too hot will cause rapid protein tightening and moisture evaporation, while too-cool cooking leads to watery, underdeveloped eggs.
Mastering How to Cook Scrambled Eggs for Beginners: Step-by-Step Instructions
Now that you understand the theory, let’s walk through the practical process. Follow these steps carefully, and you’ll be serving impressive scrambled eggs in no time.
Step 1: Preparation Is Everything
Crack 2-3 eggs per person into a mixing bowl. Add a pinch of salt now—salting early actually helps break down egg proteins, resulting in more tender eggs (contrary to old myths). If you’re using milk or cream, add 1 tablespoon per egg now. Whisk vigorously for 30-45 seconds until completely uniform with no visible streaks of white or yolk.
This aeration creates lighter, fluffier eggs.
Pro Tip: Some chefs prefer whisking in a separate bowl rather than directly in the pan, as it gives you better control over consistency and allows you to check for shell fragments.
Step 2: Heat Your Pan Properly
Place your non-stick skillet over medium-low heat. Add 1 tablespoon of butter per 2 eggs. Wait until the butter melts completely and begins to foam slightly but doesn’t brown. This indicates the pan is at the ideal temperature—around 275-300°F (135-150°C). If the butter browns immediately, your pan is too hot; remove it from heat and let it cool for a minute.
Temperature Check: You should be able to hold your hand 2-3 inches above the pan for 5-6 seconds comfortably. If you pull away quickly, it’s too hot.
Step 3: The Cooking Process
Pour your whisked eggs into the center of the pan. They should sizzle gently, not aggressively. Let them sit undisturbed for 10-15 seconds until edges just begin to set. Using your silicone spatula, gently push the eggs from the edges toward the center, tilting the pan to allow uncooked egg to flow into empty spaces.
The Key Motion: Use slow, sweeping motions rather than rapid stirring. You’re folding the eggs, not scrambling them frantically.
Step 4: Control the Cooking Speed
Continue this gentle folding every 15-20 seconds. As the eggs thicken, reduce your movements. When they reach a soft, custardy consistency with small, creamy curds forming, you’re almost done. This entire process should take 3-5 minutes for 2-3 eggs. If your eggs are cooking faster, remove the pan from heat momentarily.
Visual Cues:
- Undercooked: Runny, liquid pools
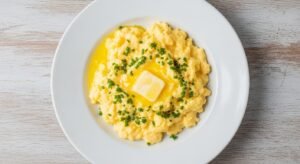
- Perfect: Soft, creamy curds with slight sheen
- Overcooked: Dry, rubbery, no moisture visible
Step 5: Know When to Stop
Here’s the golden rule: Remove eggs from heat when they look slightly underdone. Eggs continue cooking from residual heat (carryover cooking) even after leaving the pan. Transfer them to a warm plate immediately. They should appear moist and barely set—they’ll finish cooking on the plate to reach perfect doneness.
Timing Guide:
- Soft and creamy: 3-4 minutes total
- Medium set: 4-5 minutes
- Firm (not recommended): 5-6 minutes
Step 6: Finishing Touches
Season with freshly ground black pepper and additional salt if needed. Add a small pat of butter on top for extra richness if desired. Garnish with fresh herbs like chives, parsley, or dill for color and freshness. Serve immediately—scrambled eggs wait for no one.
Common Mistakes and How to Avoid Them
Even with the best intentions, beginners often fall into predictable traps. Recognizing these pitfalls will save you from breakfast disappointment. The most common error is cooking over too-high heat, driven by impatience or the misconception that faster equals better.
High heat creates large, tough curds and forces out moisture, leaving you with dry, rubbery eggs. Always prioritize medium-low heat and patience.
Another frequent mistake is over-stirring. Constantly agitating the eggs prevents proper curd formation, resulting in tiny, grainy pieces rather than soft, pillow clouds. Gentle folding every 15-20 seconds is sufficient.
Additionally, many cooks leave eggs in the pan too long, forgetting about carryover cooking. Remember: eggs should look slightly wet when you plate them. They’ll continue setting from residual heat.
Adding too much liquid is another pitfall. While a splash of milk or cream can enhance creaminess, exceeding 1 tablespoon per egg makes eggs watery and dilutes flavor. Some prefer no dairy at all, relying solely on technique and butter for richness.
Finally, seasoning mistakes abound—either under-salting or adding salt too late. Salt early to allow it to integrate fully, and always taste before serving.
Elevating Your Scrambled Eggs: Variations and Add-Ins
Once you’ve mastered the basic technique, the culinary world becomes your oyster—or rather, your egg. Scrambled eggs serve as a perfect canvas for countless flavor combinations. For a classic approach, fold in grated cheese like cheddar, Gruyere, or goat cheese during the last minute of cooking. The residual heat melts it beautifully without overcooking.
Fresh herbs transform simple eggs into something special. Chives offer a mild onion note, while tarragon adds sophistication with its anise-like flavor. Dill brings brightness, and parsley provides freshness. Add delicate herbs at the end to preserve their color and flavor.
For heartier additions, consider sautéed vegetables like spinach, mushrooms, tomatoes, or bell peppers. Cook these separately first to remove excess moisture, then fold them in during the final minute. Cooked proteins like bacon, ham, or smoked salmon also pair wonderfully. The key is ensuring add-ins are warm and not overly wet, as cold or watery ingredients will disrupt the eggs’ texture and temperature.
Conclusion
Learning how to cook scrambled eggs for beginners isn’t just about mastering a breakfast staple—it’s about building fundamental cooking skills that translate to countless other dishes.
You’ve learned that perfect scrambled eggs require patience, proper heat management, and the confidence to remove them from the pan while they still look slightly underdone. Remember the essentials: whisk thoroughly, cook low and slow, fold gently, and season thoughtfully.
The beauty of scrambled eggs lies in their versatility and forgiveness. Even if your first attempt isn’t restaurant-perfect, you’ll still have a nutritious, delicious meal. With each batch you make, you’ll develop an intuitive sense of timing and temperature that becomes second nature.