

If you’ve ever stood in your kitchen staring at a tray of chicken drumsticks and wondered, “Okay, but how long to cook chicken legs in oven so they’re actually juicy and not dry?” — you’re not alone. Chicken legs are affordable, flavorful, and family-friendly, but timing and temperature make all the difference between crispy perfection and rubbery disappointment.
The good news? Once you understand the right temperature, internal doneness, and a few simple tricks, you’ll be making Juicy Baked Chicken Legs on autopilot. Let’s walk through everything step by step so you never have to guess again.
how long to cook chicken legs in oven
The cooking time for chicken legs depends mainly on the oven temperature and the size of the drumsticks. In general, Baked Chicken Drumsticks need about:
- 35–45 minutes at 400°F (200°C)
- 40–45 minutes at 375°F (190°C)
- 30–40 minutes at 425°F (220°C)
For most home cooks, 400°F is the sweet spot. It’s hot enough to crisp the skin while still allowing the inside to cook evenly. At this temperature, average-sized chicken legs are usually perfectly cooked in around 40 minutes.
However, time alone isn’t the real answer to how long to cook chicken legs in oven. The true key is internal temperature. Chicken is safe to eat when it reaches 165°F (74°C) at the thickest part. That said, for drumsticks, many cooks prefer letting them reach 175–185°F. The extra heat helps break down connective tissue, making the meat more tender and juicy rather than chewy near the bone.
If you’re cooking from slightly chilled (straight from the fridge), stick to the higher end of the time range. If the legs are large or crowded tightly on the pan, you may also need a few extra minutes.
How do you know when they’re done?
Let’s be honest: cutting into chicken to “check” if it’s done is messy and unreliable. The most accurate way to know your Baked Chicken Legs are ready is by using a meat thermometer.
Insert the thermometer into the thickest part of the drumstick, avoiding the bone. Once it reads at least 165°F, they’re safe to eat. For maximum tenderness, aim closer to 175°F or slightly higher.
If you don’t have a thermometer, there are a few visual clues. The juices should run clear, not pink. The meat should pull slightly away from the ends of the bone. The skin should look golden brown and crisp, not pale or rubbery.
Still, a thermometer removes all doubt. It turns “I think it’s done?” into total confidence. And once you start using one, you’ll never want to go back to guessing.
How to make chicken legs in the oven
Making Best Damn Oven Baked Chicken Legs doesn’t require complicated ingredients. It’s all about technique.
Start by preheating your oven to 400°F. Pat the chicken legs completely dry with paper towels. This step is crucial because moisture on the skin prevents crisping. Place them in a bowl and drizzle with olive oil, making sure each piece is lightly coated.
Season generously. A simple mix of salt, black pepper, garlic powder, paprika, and a pinch of onion powder works beautifully. If you like a bit of heat, add cayenne or chili powder. Rub the seasoning evenly over every surface.
Arrange the legs on a baking sheet lined with parchment paper or foil. Leave space between each piece. Crowding the pan causes steaming instead of roasting, and you want that roasted texture.
Bake for about 40 minutes, flipping once halfway through if desired. For extra crispy skin, you can broil them for the final 2–3 minutes, watching carefully so they don’t burn.
Let the chicken rest for 5 minutes before serving. This helps redistribute the juices, keeping your Juicy Baked Chicken Legs moist and flavorful.
Easy and tasty chicken legs in the oven
One of the best things about Baked Chicken Drumsticks is how forgiving they are. They’re naturally higher in fat than chicken breasts, which means they stay moist even if slightly overcooked.
To boost flavor without extra work, try marinating them for 30 minutes before baking. A simple mix of soy sauce, garlic, lemon juice, and honey adds depth. Or coat them in barbecue sauce during the last 10 minutes of cooking for a sticky, caramelized finish.
If you’re aiming for that crispy, restaurant-style texture, baking on a wire rack placed over a sheet pan allows air to circulate underneath. That’s often the secret behind those perfectly crisp, evenly browned legs people call the Best Damn Oven Baked Chicken Legs.
The result? Tender meat inside, crackly golden skin outside, and a dinner that tastes like you put in way more effort than you actually did.
Can this recipe be doubled?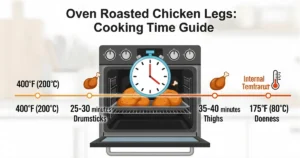
Absolutely. Chicken legs are perfect for feeding a crowd, and doubling the recipe is simple with a few adjustments.
The key is space. When making a large batch of Baked Chicken Legs, use two baking sheets instead of overcrowding one. Proper spacing ensures even browning and prevents steaming.
If you’re baking two trays at once, rotate them halfway through cooking — switch the top tray to the bottom rack and vice versa. This helps compensate for hot spots in the oven.
Cooking time usually remains similar, though it may add 5 extra minutes depending on your oven. Always rely on internal temperature rather than strictly watching the clock.
How to Tell If Chicken Legs Are Cooked?
There are simple ways to check if chicken legs are ready:
- Juices run clear: When you cut the chicken near the bone, the juice should be clear, not pink.
- Meat is no longer pink: The inside meat should be white or light brown.
- Use a meat thermometer: The internal temperature should reach 165°F (74°C).
Using a meat thermometer is the most safe and accurate way. Insert it into the thickest part of the leg without touching the bone.
Tips for Best Oven-Cooked Chicken Legs
- Do not overcrowd the tray. Leave space between legs for even cooking.
- Turn the chicken legs halfway through. This helps both sides cook well.
- Marinate the chicken for a few hours or overnight. It adds flavor and keeps meat soft.
- Use a rack on the tray if you have one. It lets heat circulate better.
- Keep the oven door closed during cooking to keep the temperature steady.
Baked Chicken Legs Video Tutorial
If you’re a visual learner, watching the process can make everything click. Seeing how dry the skin should be before seasoning, how spaced apart the legs should sit on the tray, and what perfectly golden skin looks like can boost your confidence immediately.
In most tutorials for Juicy Baked Chicken Legs, you’ll notice the same fundamentals: high heat, dry skin, generous seasoning, and proper spacing. Those four elements create reliable results every time.
Recipe tips
A few small tweaks can elevate your chicken from good to unforgettable. Adding baking powder (not baking soda) to your seasoning mix can help the skin crisp even more. Just a small amount works wonders.
Another tip is letting the chicken sit uncovered in the refrigerator for a few hours before baking. This air-dries the skin naturally and enhances crispiness.
Finally, don’t skip resting time after baking. Even five minutes allows the juices to settle back into the meat, keeping your Baked Chicken Drumsticks tender instead of dry.
What to Serve with Oven-Baked Chicken Legs?
Chicken legs go well with many side dishes. Here are some ideas:
- Rice or mashed potatoes
- Steamed or roasted vegetables
- Salad with fresh greens
- Bread or dinner rolls
- Pasta or couscous
Simple sides make a balanced meal. Choose what you like best.
How long does baked chicken last?
Once cooked, Baked Chicken Legs can be stored in an airtight container in the refrigerator for up to 4 days. Make sure they cool to room temperature before sealing and storing.
To reheat, bake at 350°F for about 10–15 minutes or until warmed through. Avoid microwaving if possible, as it softens the skin and can dry out the meat.
Serving suggestions
Chicken legs are incredibly versatile. Serve them alongside roasted vegetables, mashed potatoes, rice, or a fresh green salad. They’re also great for meal prep — pair them with quinoa or sweet potatoes for balanced weekday lunches.
Leftover chicken can be shredded and added to wraps, tacos, or pasta dishes. The flavor from properly seasoned Juicy Baked Chicken Legs carries beautifully into next-day meals.
Step-by-Step Guide to Cooking Chicken Legs in Oven
Follow these steps for tasty chicken legs:
- Preheat the oven to your chosen temperature (350°F, 375°F, or 400°F).
- Prepare the chicken legs by washing and drying them.
- Season the chicken with salt, pepper, and other spices you like.
- Place the chicken legs on a baking tray or dish. You can line the tray with foil for easy cleaning.
- Optional: Brush chicken with oil or melted butter for crispier skin.
- Put the tray in the oven.
- Cook for the time given in the table above depending on the temperature.
- Check if the chicken is done. Use a meat thermometer or check juices and color.
- Let the chicken rest for 5 minutes before serving. This keeps it juicy.
Notes
When deciding how long to cook chicken legs in oven, always prioritize temperature over time. Ovens vary, drumsticks vary, and guessing leads to inconsistent results.
If your chicken skin isn’t crisping, your oven may not be fully preheated, or the pan may be overcrowded. Small adjustments can dramatically improve the outcome.
And remember, the difference between average chicken and the Best Damn Oven Baked Chicken Legs isn’t fancy ingredients. It’s proper heat, patience, and checking doneness correctly.
Master those basics, and you’ll have perfectly cooked chicken legs every single time.