

You can replace a microwave fuse safely if you take simple precautions and follow clear steps. If the microwave is dead or the fuse looks burned, unplug the oven, discharge the high-voltage capacitor, and swap the blown fuse for the exact replacement to restore function.
This guide shows what tools to gather, where fuses hide, and how to check your work so you avoid repeat trips to the hardware store.
Take a moment to learn the safety steps and the basic signs of a blown fuse before you open the cabinet. With a little care, you can save time and money by handling this common fix yourself.
Key Take ways
- Always cut power and follow safety steps before opening a microwave.
- Match the replacement fuse type and rating to the original part.
- Test the appliance and watch for recurring issues after replacement.
Understanding Microwave Fuses
Microwave fuses protect internal circuits from dangerous currents and heat. They stop the microwave from powering on when a fault occurs and can be replaced when blown.
What Is a Microwave Fuse
A microwave fuse is a small safety device that interrupts electric flow when current or temperature climbs too high. It sits on the control board or near the power entry and protects components like the magnetron, transformer, and high-voltage parts.
Usually, it is a single-use component: once it opens, it must be replaced. Technicians test it with a multimeter set to continuity or resistance. If the meter shows no continuity, the fuse is blown. Always unplug the microwave and wait several minutes before accessing internal parts to avoid shock from capacitors.
Common Types of Fuses in Microwaves
Microwaves use a few specific fuse types. The main ones are:
- Ceramic cartridge fuses — Common for high-voltage protection. They look like small glass tubes but are ceramic and handle higher temperatures.
- Thermal fuses (thermal cutoffs) — Open when internal temperature exceeds a safe limit. They are non-resettable and mounted near the cavity or magnetron.
- Blade or inline fuses — Less common, used on some control boards or external power modules.
| Type | Location | Purpose |
| Ceramic cartridge | Control board / HV circuit | Overcurrent protection |
| Thermal fuse | Cavity area / near magnetron | Overheat protection |
| Blade/inline | Power entry / board | General circuit protection |
Match the replacement to the exact amperage, voltage rating, and physical size printed on the old fuse or in the manual.
Signs of a Blown Microwave Fuse
A blown fuse often causes the microwave to show no power at all. The display may be dead, and no lights, fan, or turntable will run. Sometimes the interior light comes on while the oven won’t heat; that suggests a specific high-voltage fuse or thermal cutout failed.
Other signs include intermittent operation, sparks, or a burning smell right before failure. If a fuse blows repeatedly after replacement, a downstream component—like the magnetron, transformer, or diode—may be faulty. In that case, testing components and inspecting for visible damage helps find the real cause.
Safety Precautions Before Repair
Turn off power at the source, gather insulated tools, and wear protective gear. Confirm the microwave is fully de-energized and have a safe, well-lit workspace before opening the cabinet.
Disconnecting Power Properly
The technician must unplug the microwave and switch off the correct circuit breaker at the home panel. Unplugging alone may leave the internal high-voltage capacitor charged, so the breaker cut ensures no accidental re-energizing while working.
After power is off, they should wait at least 5 minutes for stored charge to bleed down. For added safety, they can discharge the high-voltage capacitor with a properly rated insulated tool or have a trained electrician do it.
They must verify no voltage with a multimeter on the mains input and across the capacitor terminals before touching internal parts. If the microwave is hard-wired, the technician must lock out and tag the circuit or have a qualified professional disconnect it.
Essential Tools and Equipment
They need a digital multimeter rated for at least 600 V, insulated screwdrivers, and needle-nose pliers with insulated handles. These tools let them check fuses, measure voltage, and remove fasteners without metal-on-metal slips.
Personal protective equipment should include safety glasses and electrical-rated gloves. Rubber-soled shoes and a non-conductive work mat reduce shock risk.
Keep replacement fuses that match the microwave’s exact type and rating (current, voltage, and slow/blow vs. fast/acting). Using the wrong fuse can cause repeat failures or create hazards.
Locating the Microwave Fuse
The fuse usually sits near the power entry, transformer, or magnetron assembly and often requires removing the outer cover to see it. Identifying the exact location depends on the microwave’s style and brand, and accessing it safely means unplugging the unit and discharging stored voltage first.
Identifying Fuse Placement in Popular Models
Many countertop microwaves place the main fuse near the power cord entry or on the control board. For example, Samsung and LG models often have a small ceramic or glass fuse mounted on a bracket beside the AC inlet or on the chassis near the high-voltage transformer.
Commercial or over-the-range models sometimes add a cavity thermal fuse on the oven wall; this one sits against the cavity liner and may need the inner panel removed.
Check the model’s parts diagram or service manual for exact placement. Manufacturer sites and parts diagrams at Sears PartsDirect or the microwave’s official support page can show where fuses sit for specific models. Always match the fuse type and rating to the diagram before buying a replacement.
Accessing Internal Microwave Components
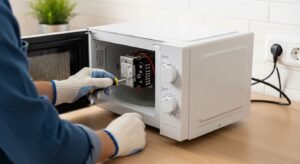
Start by unplugging the microwave and waiting several minutes. Next, remove the outer cabinet screws—usually on the back and sides—and lift the casing straight up. Keep screws organized and note any wire harness clips to avoid damage.
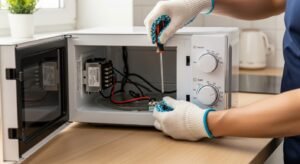
Before touching internal parts, discharge the high-voltage capacitor using a suitable insulated tool or have a technician do it; the capacitor can hold a dangerous charge. Use a flashlight to locate the fuse: look for a small tube-style (ceramic or glass) or a blade fuse on a holder near the power entry, control board, or magnetron. If unsure, consult an iFixit guide or the appliance’s service manual for step-by-step photos and safety tips.
How to Remove a Blown Microwave Fuse
Handle power first, then open the cabinet and locate the fuse behind the service panel. Use basic tools and a multimeter to confirm the fuse is blown before touching any internal parts.
Taking Apart the Microwave Safely
They must unplug the microwave and let it sit for several minutes to discharge any stored charge. He or she should wear safety gloves and eye protection, and work on a clear, stable surface with good lighting.
They remove the screws on the rear service panel with the correct screwdriver. Keep screws in a small container and note their positions. If the microwave is built into cabinetry, they should pull it out or have a helper steady it.
Before touching anything inside, they use a multimeter set to continuity or ohms to check that the outlet and internal circuits are dead. They avoid the high-voltage capacitor area; if unsure where that is, they stop and call a professional.
Extracting the Faulty Fuse
They locate the fuse—usually in a small holder near the power cord entry or on the control board—and inspect it visually for a broken wire or dark burn marks. If the Circuit protector is glass, a snapped filament is a clear sign; ceramic fuses may show scorching.
To remove it, they gently pry the Circuit protector holder clips apart with a flat screwdriver or use needle-nose pliers to pull the fuse straight out. If the Circuit protector is soldered, they heat the solder with a soldering iron and lift the fuse free, taking care not to damage nearby parts.
They test the removed Circuit protector with the multimeter to confirm an open circuit. They then prepare the correctly rated replacement fuse (voltage and amperage must match) and handle it by the ends when installing.
Selecting and Installing a New Fuse
This section explains how to pick the right fuse for a specific microwave model and how to fit it safely. It covers reading the parts label, matching electrical ratings, and using safe steps to install the new part.
Choosing the Correct Replacement Fuse
They must match the microwave’s exact Circuit protector type, voltage, and current rating. Check the oven’s parts label, user manual, or the model-specific parts list online to find the factory part number. Do not substitute a higher-amp fuse; that can hide a wiring or component fault and cause a fire.
Common Circuit protector types include ceramic cartridge Circuit protector and thermal Circuit protector . Note the physical size and lead style (wire leads, blade, or cartridge) so the new part fits the holder. If the microwave uses a non-resettable thermal Circuit protector or a cavity thermostat, replace it with the exact OEM part.
Buy fuses from a reputable appliance parts supplier. Keep the original Circuit protector as a reference photo when ordering. If repeated blows happen after replacement, have a qualified technician diagnose the underlying fault.
Proper Installation Techniques
They should always disconnect the microwave from power before starting. Unplug the unit and, if hard-wired, switch off the breaker and confirm no power with a meter or tester.
Wear safety glasses and avoid touching the high-voltage capacitor. Discharge the capacitor per the manufacturer’s instructions or let a qualified technician handle it if unfamiliar. Remove the outer cover using the correct screwdriver and keep screws organized.
Replace the Circuit protector by gently pulling the old Circuit protector from its clips or desoldering if mounted. Install the new fuse with firm but careful pressure so clips hold it without bending. For soldered connections, use a proper soldering iron and fresh solder, avoiding cold joints.
Reassemble the cover, restore power, and test the microwave briefly. If the new Circuit protector blows immediately, unplug it and seek professional repair.
Testing the Microwave After Fuse Replacement
Check that all screws, panels, and wire connectors are secure and that the power cord is undamaged before plugging the microwave back in. Test with a short run and a simple load to confirm heating and normal operation.
Reassembling the Microwave
They should first confirm the cabinet and control panel sit flush and all screws are tightened to the same torque as before. Reconnect any wire harnesses to their original terminals and route wires away from moving parts and sharp edges. If the model used grounding straps or chassis clips, reinstall them exactly where they belonged.
Use the same screws removed earlier; never substitute longer screws that could hit internal components. Replace the waveguide cover or any mica sheet if worn. Before closing the case, visually inspect the Circuit protector holder to ensure the new Circuit protector is seated and the holder clips bite the Circuit protector firmly.
Verifying Successful Operation
They must plug the microwave into a known-good outlet and stand clear of the case while powering it on. Start with a 30-second test using a cup of water to check heating and to avoid long runs during initial tests. Watch for normal sound, stable turntable motion, and no burning smells or unusual sparks.
If the Circuit protector blows immediately or the unit does not power, unplug it and do not attempt more tests. Check for loose wires, shorted components, or a misinstalled Circuit protector. If the microwave runs but does not heat, the problem may be the diode, magnetron, or high-voltage capacitor; consult a qualified technician.
Tips for Preventing Future Fuse Failures
Keep the microwave on a properly rated circuit, avoid running it empty, and clean spills and vents regularly. Check power cords and outlets for damage and replace worn parts promptly.
Addressing Underlying Electrical Issues
They should have the microwave on a 15A or 20A dedicated kitchen circuit, not a shared outlet with heavy appliances like a toaster oven. If the breaker trips or the Circuit protector blows repeatedly, a qualified electrician must test the outlet, circuit wiring, and wall receptacle for loose connections, incorrect wiring, or voltage drops.
Inspect the microwave power cord for frays, kinks, or burn marks. Replace the cord or plug if damaged. If the unit uses a grounded plug, do not remove the ground; fix the outlet instead. Use a surge protector rated for kitchen appliances to blunt brief power spikes, but do not rely on a cheap strip.
Routine Microwave Maintenance
They should keep the cavity, vents, and turntable clean to prevent arcing and overheating. Wipe food splatter after each use and deep-clean the interior monthly using a mild detergent and a soft cloth. Hardened food on the waveguide cover or interior walls can cause hot spots that stress Circuit protector.
Inspect the door seal and latches for damage; a poor seal can cause microwave leakage and extra load. Check the exhaust fan and air intake for obstructions; vacuum or brush dust from vents every few months. If the turntable motor or fan makes unusual noises, have a technician replace the faulty part before it causes repeated Circuit protector blows.
FAQs
What are common signs a microwave fuse is blown?
A microwave that shows no power, has a dead display, or does not start is often due to a blown Circuit protector. They may also smell burned or show visible breakage when inspected.
Is it safe for someone without electrical experience to replace the fuse?
They can replace the fuse if they follow safety steps and feel comfortable with basic hand tools. However, anyone unsure should hire a qualified technician because internal high-voltage parts can be dangerous.
How does one find the right replacement fuse?
Check the microwave’s model number and the parts diagram or the old Circuit protector for ratings (amperage, voltage, and type). Using the exact match avoids further damage.
What tools and safety gear are needed?
Basic tools include a screwdriver, multimeter, and needle-nose pliers. They should always unplug the microwave and use eye protection and insulated tools.
Will replacing the fuse fix other microwave problems?
A new fuse fixes only fuse-related failures. If the Circuit protector blows again, deeper faults like a shorted transformer, diode, or magnetron may be present and need professional repair.
How long does a fuse replacement take?
A simple fuse change often takes 15–30 minutes for someone prepared with the right tools and the correct part.
Can warranty or repair policies be affected by DIY repair?
Doing DIY repairs can void the manufacturer’s warranty. It’s best to check warranty terms before opening the microwave.
Conclusion
They followed safety steps and checked the user manual before starting. This reduced risk and helped them find the right fuse type and rating.
They unplugged the microwave and discharged any stored charge when needed. This simple step kept the work area safe and prevented electric shock.
They removed the old Circuit protector carefully and matched the replacement by size and amperage. Using the correct Circuit protector preserved the microwave’s safety features and function.
If the new Circuit protector blew again, they inspected for deeper faults like a bad diode or magnetron. Persistent problems mean a technician should look further to avoid repeated failures.
They kept the workspace clean and used basic tools suited for the job. Neat work and correct parts made the repair quicker and more reliable.
For those unsure about any step, they chose professional help rather than risk injury. This decision protected both the person and the appliance while ensuring a proper repair.