

Your kitchen sink takes more abuse than almost any surface in your home. Every single day it handles raw meat juices, coffee grounds, vegetable scraps, grease, and hard water — yet somehow we expect it to keep gleaming like it just came out of the showroom.
The good news? You don’t need harsh chemical cleaners packed with fumes and warnings to get it spotless. Learning how to clean stainless steel kitchen sink naturally is not only better for your health and the environment, but it’s also surprisingly effective.
In this guide, you’ll discover simple, proven techniques using everyday pantry staples that will leave your kitchen sink sparkling, odor-free, and protected without a single synthetic chemical in sight.
Why Natural Cleaning Works Better Than You Think
Before diving into the methods, it’s worth understanding why natural cleaners are genuinely powerful — not just a trendy alternative.
Stainless steel is an incredibly durable material, but it has a grain, much like wood. When you scrub against that grain with abrasive chemical cleaners kitchen sink , you create micro-scratches where bacteria and mineral deposits love to hide.
Natural ingredients like baking soda are mildly abrasive in exactly the right way — they lift grime without gouging the surface. White vinegar, on the other hand, is a mild acid that dissolves the alkaline mineral deposits left by hard water. Together, they tackle almost every problem your sink will ever face.
Chemical cleaners often leave behind residue that reacts with food contact surfaces. Natural cleaners rinse clean, leave no harmful residue, and are safe around children and pets. Once you make the switch, you’ll wonder why you ever paid for specialty sink cleaners.
How to Clean Stainless Steel Kitchen Sink Naturally: Step-by-Step Daily Routine
Consistency is the secret weapon against a grimy sink. A quick daily clean takes less than two minutes and prevents buildup from ever becoming a real problem.
Step 1: Rinse thoroughly After each use, rinse the entire sink basin with warm water. This removes loose food particles and dilutes any acidic substances (like lemon juice or tomato sauce) that can pit the surface over time if left sitting.
Step 2: Apply a few drops of mild dish soap Put a small amount of dish soap on a damp microfiber cloth and wipe down the entire sink — sides, bottom, and rim — always moving in the direction of the grain. You can usually see the faint brushed lines if you look closely in good light.
Step 3: Rinse and dry Rinse away all soap, then — and this is the step most people skip — dry the sink with a clean cloth. Water left to air-dry is the number one cause of those cloudy white water spots that make a clean kitchen sink look dirty.
Removing Hard Water Stains and Mineral Deposits Naturally
Hard water stains are the chalky, whitish deposits that collect around the drain and faucet base. They’re one of the most common complaints about stainless steel sinks, and white vinegar is the most effective natural solution.
Hard water contains high concentrations of dissolved calcium and magnesium. When the water evaporates, those minerals stay behind and bond to the metal surface. The longer they’re left, the harder they become to remove. This is why even a “clean” kitchen sink can look dull and spotty.
The acetic acid in white vinegar reacts with these alkaline deposits and breaks the bond, allowing them to be wiped away effortlessly. It’s basic chemistry working kitchen sink entirely in your favor, with no fumes, no gloves required, and no damage to your drain or pipes.
Step 1: Soak paper towels in white vinegar Saturate paper towels or a cloth with undiluted white vinegar.
Step 2: Apply to affected areas Press the vinegar-soaked towels directly onto the hard water stains. For vertical surfaces, the paper towel will cling well enough to stay in place.
Step 3: Let sit for 20–30 minutes Give the acid time to dissolve the mineral deposits. For particularly stubborn buildup, you can leave it up to an hour.
Step 4: Scrub and rinse Remove the towels, scrub gently with a soft cloth, and rinse thoroughly with warm water. Dry immediately.
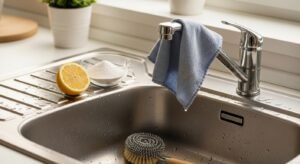
The Lemon Juice Polish Method for a Brilliant Shine
When you want your sink to genuinely sparkle, lemon juice is a fantastic finishing treatment. The citric acid in lemon juice acts similarly to vinegar but leaves behind a fresh, clean scent and a subtle brightening effect on the steel.
Cut a lemon in half and rub it directly over the sink surface, squeezing gently as you go to release the juice. Pay particular attention to any remaining dull spots or faint staining. Let the juice sit for five minutes, then rinse thoroughly and dry with a microfiber cloth.
The result is noticeably brighter than a standard clean and your kitchen sink will smell wonderful in the process. This method works beautifully as a finishing step after your baking soda deep clean.
How to Remove Rust Spots from a Stainless Steel Kitchen Sink
Despite its name, stainless steel can develop rust spots — usually caused by leaving cast iron cookware in the sink, or from metal particles transferred from other sources.
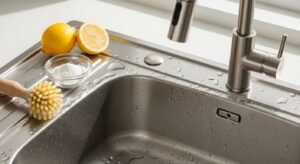
Step 1: Make a baking soda paste Mix baking soda with just enough water (or lemon juice for extra power) to create a thick paste.
Step 2: Apply to the rust spot Spread the paste over the rust spot and leave it for 30 minutes.
Step 3: Scrub gently with the grain Use a soft cloth or a gentle scrubbing pad. Never scrub against the grain — you’ll spread surface damage.
Step 4: Rinse and inspect Rinse and check the result. Repeat if needed. For very stubborn rust, a small amount of cream of tartar mixed with lemon juice is remarkably effective.
Deodorizing Your Sink Drain Naturally
A clean sink can still smell bad if the drain is harboring buildup. Here’s a quick, natural fix that works every time.
- Pour half a cup of baking soda directly down the drain
- Follow with half a cup of white vinegar
- Allow the fizzing reaction to work for 10–15 minutes
- Flush with a full kettle of boiling water
This combination breaks down grease, soap scum, and organic material kitchen sink clinging to the inside of your drain pipe. Do this once a week and you’ll never deal with a smelly drain again.
Polishing and Protecting Your kitchen sink After Cleaning
Cleaning kitchen sink gets you to spotless. Polishing keeps you there longer.
Once your sink is completely clean and dry, put a few drops of mineral oil, baby oil, or even olive oil on a soft cloth. Buff this into the entire sink surface, following the grain, until no oily residue remains — just a subtle protective sheen. This thin oil barrier repels water, reducing the speed at which new water spots form. It also gives the steel a rich, deep luster that looks genuinely impressive.
You don’t need to do this after every clean. Once a week or every couple of weeks is plenty to maintain the protection.
Common Mistakes to Avoid
- Scrubbing against the grain — always move with the brushed lines
- Leaving the sink wet — air-drying causes water spots every time
- Using steel wool or abrasive pads — they permanently scratch the finish
- Leaving bleach or bleach-based products on the surface — causes pitting and corrosion
- Soaking the sink with standing water — especially if it contains salt or acid
Conclusion
Now you have everything you need to know about how to clean stainless steel kitchen sink naturally — from quick daily maintenance to deep cleaning, hard water removal, rust treatment, and polishing.
The core takeaway is simple: baking soda for scrubbing, vinegar for mineral deposits, lemon for brightening, and oil for protection. Four natural ingredients, zero harsh chemicals, outstanding results.
Make the daily rinse-and-dry habit your non-negotiable starting point, layer in a baking soda scrub twice a week, and tackle hard water stains with vinegar whenever they appear. Your sink will reward you with a consistently brilliant, hygienic surface that genuinely looks good.